
Designing 3D Printed Transmission Line Active Monitor Speakers
My role
As a personal project, I single-handedly assumed multiple roles to bring it to fruition.
- Product Designer
- Audio Engineer
- Fabricator
In the realm of personal projects, the fusion of passion and expertise often yields remarkable results. This case study delves into one such venture: the design and creation of a pair of high-quality active desktop monitor speakers, undertaken purely for my enjoyment and personal use. As an experienced product and industrial designer, I sought to leverage my skills in a challenging and fulfilling way, marrying my love for music with my professional acumen.
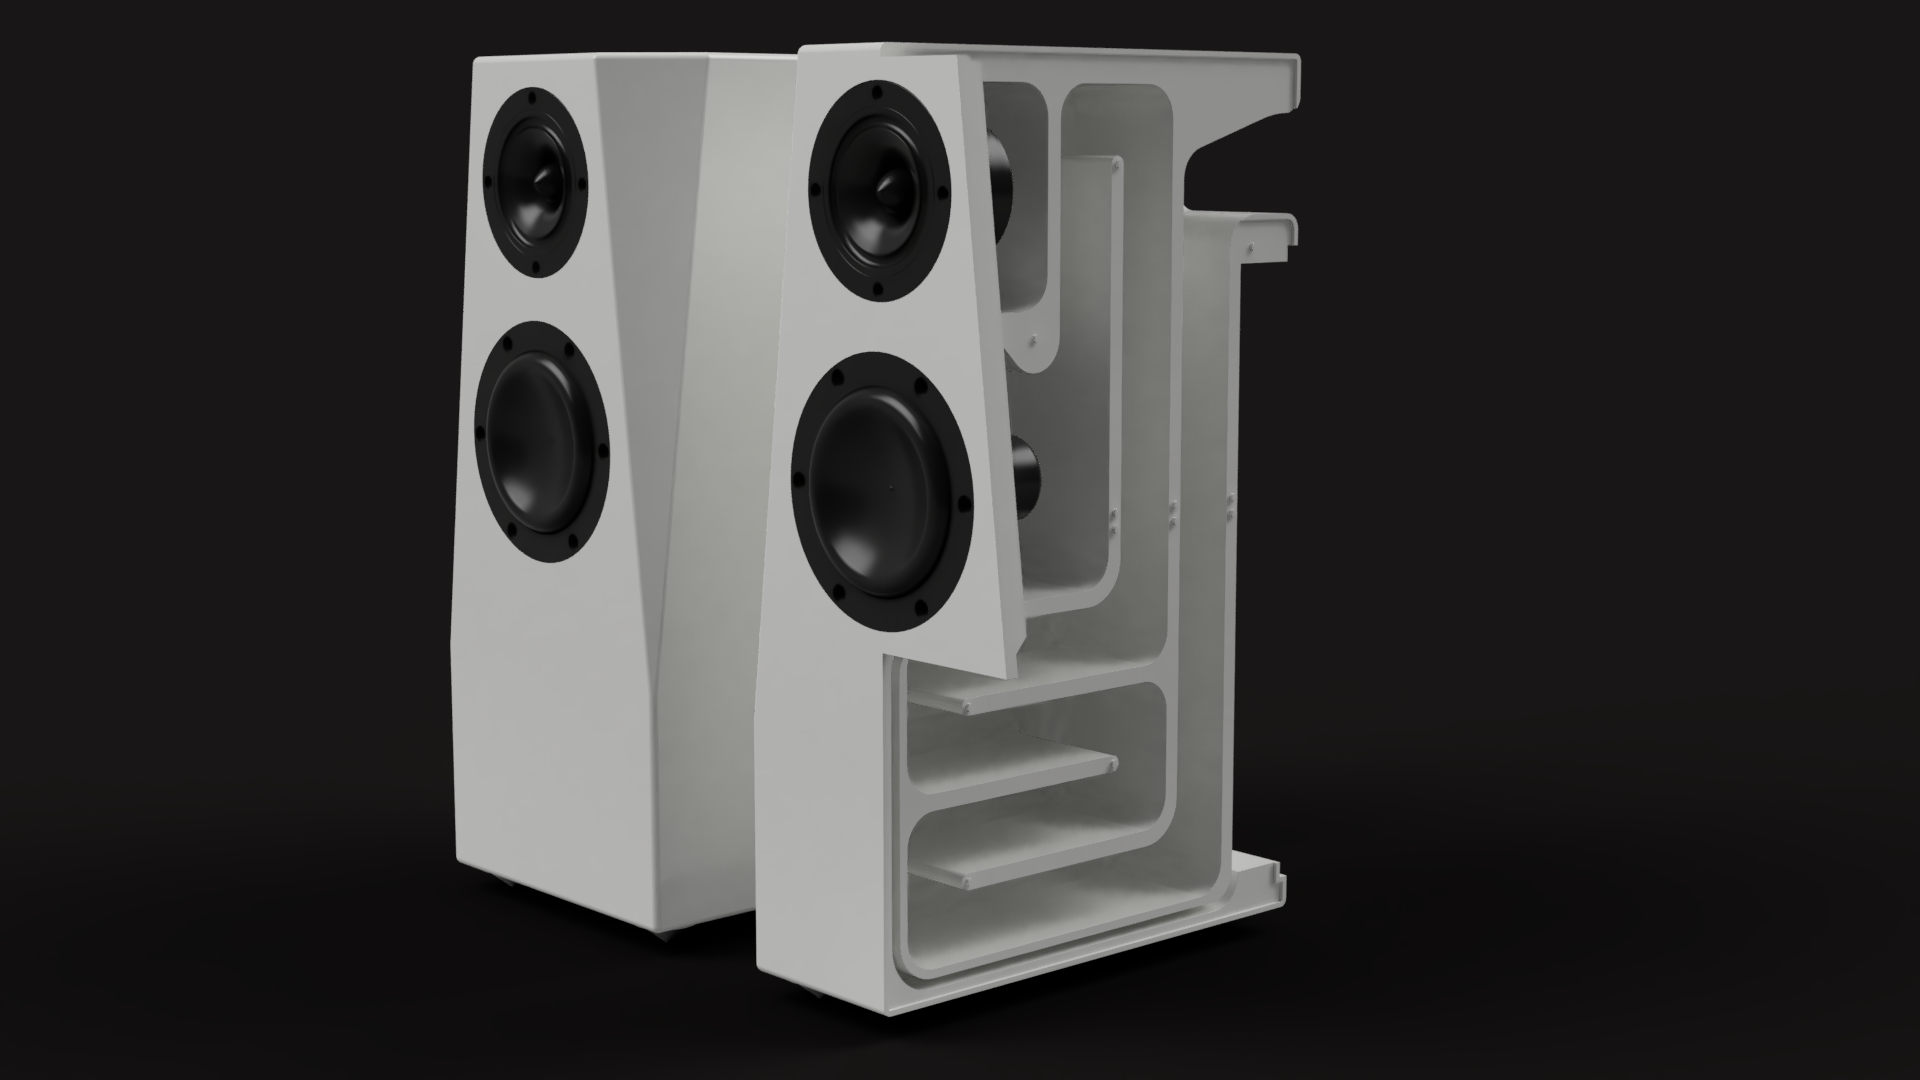
Each speaker in this pair boasts a full-range driver and a subwoofer, the latter enhanced by a transmission line I engineered with the aid of artificial intelligence. This innovative approach allowed for precise calculations, optimising the speakers’ audio output far beyond typical DIY projects. Powering this system is a single Wondom amplifier unit, chosen for its reliability, cost, small form factor and quality performance.
Considering the complexity of the speaker’s internal structure, traditional woodwork was impractical. Instead, I turned to 3D printing using ABS plastic—a method that introduced its own set of challenges yet was perfectly suited to the intricate designs I envisioned. This choice underscores a blend of modern manufacturing techniques with traditional audio engineering, executed within the confines of my personal workspace using Sigma Studio software.
The project surpassed my expectations, producing a sound quality that not only fills my space with crystal-clear audio but also stands as a testament to the integration of advanced design and personal craftsmanship. This case study not only reflects on the technical aspects of the design but also celebrates the joy and satisfaction derived from pursuing a personal passion through my professional lens.
Why speakers?
As a designer deeply attuned to sensory experiences, my work spans a variety of mediums, each catering to a different sense—from the visual allure of UI and animation to the tactile engagement of material selection and its interaction with human touch. Beyond my professional realm, my passion extends to cooking, where the aromas and flavours of cooking enrich my sensory world. It’s this multi-sensory approach to life and work that heightens my appreciation for music, an ever-present companion during my hours spent as a product designer. Thus, designing a pair of speakers that could enhance my daily environment seemed not only fitting but almost necessary. This endeavour allowed me to create an auditory experience as rich and detailed as the tastes and sights I cherish.
This project was not my inaugural journey into speaker design. My fascination with acoustic design began during my academic years in design college and university, where I undertook numerous speaker projects. Each iteration brought me closer to understanding how elements of design could converge to influence and elevate the auditory experience. With nearly a decade of explorations and iterations behind me, this latest project stands as a culmination of past experiences—a finely tuned set that I could use and appreciate every day, crafted with the expertise of a seasoned designer seeking to perfect his personal soundscape.
Technologies and Theories
3D Printing
My long-standing fascination with 3D printing, which began during my university years, has profoundly influenced both my professional and personal projects. As a designer who regularly experiments with and solves practical problems using my own two 3D printers, I naturally chose this method for my latest speaker project. The ability to rapidly prototype and test different designs using 3D printing allowed me to iterate quickly and refine the speaker’s form and function with great precision.
The primary challenge in designing these speakers was achieving a compact form factor capable of delivering deep bass notes—typically requiring larger subwoofer volumes. My research into transmission lines showed that it was possible to dramatically reduce the volume of the enclosure. However, this complexity in design would have been difficult to manage with traditional materials like wood. 3D printing offered a viable solution, allowing for enhanced design complexity that traditional methods could not easily replicate.
Despite the advantages, 3D printing does pose challenges, notably in the materials’ sound-dampening qualities which are inferior to wood. To address this, I opted for ABS printed in a dense gyroid pattern, which I supplemented with additional sound-dampening materials to minimise reverberations. This ensured that the speakers not only met but exceeded performance expectations, sounding as good as they looked.
Transmission Line
In speaker design, a transmission line is a type of speaker enclosure that helps improve the sound quality, particularly the bass or lower frequency sounds. To understand this in simpler terms, think of a transmission line as a long tunnel or maze inside the speaker box.
When sound is produced by the speaker’s driver (which is like the main loudspeaker), some of the sound waves go forward towards the listener, and some go backwards inside the speaker box. Normally, these backward-going waves could bounce around inside a regular box and interfere with the sound coming out, potentially muddling the audio.
In a transmission line speaker, these backward-moving waves are funnelled through a carefully designed path or “line” within the speaker. This path is usually folded back and forth inside the enclosure to make it long enough despite the speaker’s compact size. The design of this path is crucial because it allows these waves to travel and gradually lose energy before they can interfere with the clean sound coming out of the front of the speaker.
The result is that the speaker can produce clearer and deeper bass sounds than it might in a more typical box design without the transmission line. It’s like the tunnel guides and tames the sound waves to improve what you hear.
Using AI (artificial intelligence) in Product Design
In the intricate process of designing my 3D printed transmission line speaker enclosure, I turned to artificial intelligence (AI) to tackle several complex calculations that were crucial for optimising the speaker’s performance. The AI was instrumental in determining the precise shape and length of the transmission line, ensuring that it matched perfectly with the speaker’s performance variables. This technology also allowed for precise consideration of the material properties of the 3D printed ABS plastic, and it played a pivotal role in designing the internal maze-like structure of the transmission line.
Utilising AI in this manner enabled a level of precision and customisation that would be challenging to achieve manually. The methodology behind these AI calculations is something I plan to keep proprietary, as it represents a significant innovation in speaker design that I intend to refine and possibly replicate in future projects. This approach not only streamlines the design process but also enhances the acoustic performance of the speakers.
Computer Aided Design (CAD)
Computer-Aided Design (CAD) is a technology used to create precise drawings and technical illustrations of objects. This tool is essential for 3D printing, as it allows designers to construct detailed digital models that can be directly translated into physical objects. I chose to use CAD for this project because it enables fast and cost-effective creation of highly accurate prototypes, streamlining the design and production process while ensuring precision in the final product.
The Design Phase
Goals
The initial phase of the design process involved clearly defining the goals for this project:
- Superior Audio Quality: Achieve high-quality audio output that enhances my daily listening experience.
- Compact Design: Ensure the speakers are compact enough to comfortably fit on the desk in my home design studio.
- Robust Bass Performance:Deliver a substantial amount of bass without requiring a separate subwoofer.
- Home Production Feasibility: Design the speakers to be manufacturable at home using available tools, including power tools, 3D printers, and soldering equipment.
Components
With the project goals established, the next step involved selecting the components for the build. Several factors came into play during this decision-making process, including cost, availability, form factor, compatibility, and quality. Balancing these considerations ensured that the chosen components would align with the project objectives while meeting performance expectations.

Amplifier
Sure Electronics AA-JA33285 4 x 30 Watt Watt Class D Audio Amplifier Board
An audio amplifier with Bluetooth and built-in DSP in DIY speakers amplifies audio signals, enables wireless streaming from Bluetooth devices, and enhances sound quality through digital signal processing. This setup provides convenient connectivity and superior sound customization in custom speaker builds.

Full-range Driver
Dayton Audio RS75-8 3″ Reference Full-Range Driver
Pairing a full-range driver with a subwoofer without needing a tweeter simplifies speaker design and reduces crossover complexity. The full-range driver handles a wide spectrum of frequencies, delivering clear midrange and high frequencies, while the subwoofer focuses on robust bass output. This setup offers a more seamless sound integration and fewer components, which can improve overall sound coherence and reduce potential phase issues.

Subwoofer
Tang Band W3-1876S Subwoofer
A subwoofer is specifically designed to reproduce low-frequency sounds, typically below 200 Hz. This enhances the overall audio experience by adding depth and power to bass-heavy music and sound effects, allowing the main speakers to focus on the mid and high frequencies without distortion.

Power supply
Mean Well GST90A24-P1M Power Adaptor
The power supply provides the necessary electrical energy to drive the amplifier, which in turn powers the speakers. It ensures that all components receive a stable and adequate voltage, crucial for maintaining consistent sound quality and volume.

Programmer
Sure Electronics WONDOM In-circuit Programmer with BLE Bluetooth for APP control
A DSP programmer board in a DIY speaker build is a device used to upload and configure digital signal processing (DSP) algorithms onto a DSP chip. It facilitates communication between the DSP chip and programming software, such as SigmaStudio, allowing you to customise how the DSP manipulates audio signals for improved sound quality and functionality in your speaker system.
Design
Once I had the components I used a set of calipers to accurately measure them as I don’t always trust the specs provided. I then used these measurements to start sketching different concepts of various shapes and form factors. I did most of these sketches on my iPad using an app called Concepts.


The design process began with refining initial sketch concepts, ultimately selecting a design featuring two freestanding vertical monitors with the full-range driver positioned above the subwoofer. The design incorporated a uniquely angled triangular baffle to match the shape of the drivers and optimise sound wave reflection.
I then transitioned to modelling in Autodesk Fusion 360, a preference for this project, though I have utilised other CAD software like Autodesk Inventor, Solidworks, and OnShape in past projects. The initial step involved creating digital versions of each component I had selected to ensure the enclosure was built accurately around them.
Utilising AI-generated transmission line calculations, I determined the minimum viable form factor for the enclosure, which led to the creation of a Version 1 prototype. Given the 3D printing method chosen for production, I designed the model in four sections to fit the printer bed and avoid angles over 45 degrees. This approach eliminated the need for support material, reducing print times, post-processing effort, and costs.
After multiple iterations and both digital and physical testing, I refined the CAD model for final printing. The design featured guide pins and slots for airtight assembly crucial to maintaining the enclosure’s acoustic properties. It also included cable guides for neat internal wiring and was optimised for a 40% gyroid infill to reduce the use of ABS plastic, thus saving on time and costs. Although ABS doesn’t match the acoustic properties of denser materials like MDF wood, I compensated for this by integrating carefully selected sound-dampening materials within the enclosure.


Video overview
A short video animation showing how each speaker is constructed.
The Build
3D Printing the Parts
After completing the CAD designs and confirming the prototypes, I began 3D printing the speaker enclosures using ABS plastic, known for its resilience. To optimise printing time and material usage, I chose a 40% infill with a gyroid pattern, which significantly cuts down on both, though it results in a less dense enclosure that could potentially affect sound quality.
Each speaker took about 24 hours to print—a considerable investment of time, underscoring the importance of thorough testing to ensure each print’s success.
Given the large size of the speakers relative to my printer’s small printing area, I had to divide each speaker enclosure into four segments. These segments were designed with locating pins and a lip for precise alignment and an airtight seal once assembled. I used a strong, thick epoxy resin adhesive to bond the parts, ensuring there were no leaks to maintain sound quality. Generous amounts of adhesive were applied, and clamps were used to secure the pieces while the glue cured.
Before assembling, I installed and cut the internal cables to length, as it would have been impossible to insert them post-assembly.


Assembly
The next step was to test fit all the components to ensure accurate placement, such as verifying that the speakers would fit properly. Thankfully, due to precise measurements, reliable CAD software, and the quality of my Bambu P1S 3D printer, everything fit perfectly. I secured the speaker plate using both epoxy and screws for robust assembly.


The Electronics
The next step involved setting up the electronics. I used various cables and LEDs provided with the amplifier board, and combined them with switches and potentiometers. This setup allowed for a power input, a master switch, and knobs to adjust the volume, treble, and bass. Additionally, I included a button to reset the Bluetooth connections and LEDs to indicate Bluetooth connectivity and power status.
I also 3D printed a case that could be mounted to the back of one of the speakers to house all these components neatly and securely.
It was crucial to conduct a preliminary test of the components at this stage. This test wasn’t indicative of the final sound quality, as the DSP programming had not yet been implemented, but it was necessary to confirm that all components were functional and correctly installed without risk of damage.
During this test, I made basic adjustments to the crossovers and tested each driver at different frequencies to verify correct wiring and functionality.
After confirming everything was in order, I disassembled the components again in preparation for the final finishing steps.


Painting and Finishing
For the finishing touches on the speakers, I chose an off-white gloss ivory paint with the goal of achieving a high-end mirror finish.
Initially, I applied a body filler to the enclosures to address the rough and slightly porous surface left by the 3D printing process. After the filler dried, I sanded it down to create a smooth and even surface suitable for priming.
I then applied several thin layers of white primer, followed by careful sanding to eliminate any imperfections and ensure a flat surface. Once the primer was fully dry, I proceeded with multiple thin coats of gloss ivory paint. Impatience led to a small error during this stage; I rushed the sanding process with wet and dry paper, which ultimately prevented me from achieving the perfect mirror finish I aimed for with the gloss lacquer top coat. Despite this, the speakers still turned out looking great, though I’m aware they’re not flawless.
This painting and finishing phase was the most time-consuming and challenging part of the entire build.


The last thing to do was to add all the components back in and solder any connections such as speaker wires to the speaker drivers. Then it was time to connect the Programmer to the DSP and open up SigmaStudio to begin programming.
Audio Engineering
Although I am not an audio engineer and was relatively new to working with Digital Signal Processors (DSPs), I was able to harness the wealth of information available on programming DSPs to effectively use Sigma Studio software. By connecting my speaker’s amplifier to the software, I managed to fine-tune the amp settings precisely to my needs.
Specifically, I adjusted the crossover settings for the full-range driver and subwoofer to match the acoustics of my home design studio, significantly enhancing the sound quality.
One challenge I faced was that at full volume, the speakers sometimes drew more power than my power supply could handle, causing them to cut out. To resolve this, I adjusted the DSP settings to draw less power, sacrificing a slight amount of volume for stability. However, the speakers are still more than loud enough for home use, and I rarely needed the maximum volume.
Navigating SigmaStudio and learning to work with a DSP was a steep learning curve for me. While I haven’t tapped into the full potential that an experienced audio engineer might achieve, I thoroughly enjoyed the process. The audio quality of my speakers is exceptional, and any further improvements would only offer marginal gains.

Testing
Throughout each stage of this build, I conducted thorough testing to ensure everything from component fitment and air tightness of the enclosure to the acoustic properties of the materials used was optimal. Leveraging my years of experience, I managed most aspects of testing, although some areas required me to learn new techniques, particularly in assessing audio output quality.
For this, extensive research led me to use a specialized audio engineer’s microphone to measure the speakers’ frequency output. This data was invaluable as it allowed me to make precise adjustments in the SigmaStudio software, aiming for as flat a frequency response as possible.
However, the ultimate test of the project’s success was more subjective: listening to my favourite music through the speakers to determine if all the effort in designing and building was worthwhile. After numerous prototypes, tests, and tweaks, I am delighted with their performance. While they may not be the world’s best speakers, they are custom-tailored to my preferences and my workspace, making them exceptional in my eyes (or should I say ears?). They are, without a doubt, the best sounding speakers I have personally experienced.
The Finished Product


Overview
I am extremely pleased with the final outcome of this project. The speakers not only look great and fit perfectly on my desk, but they also deliver phenomenal sound quality. While there are aspects of the design I could improve, particularly the finish and the choice of power supply, these are minor details in the grand scheme of things.
Feedback from others who have experienced the speakers in situ has been overwhelmingly positive. While I am tempted to make another set, perhaps even for sale, it’s important to remember that this was a personal project, designed specifically for my own use. I’m proud to say that I achieved all my goals with this project, and the journey was, in many ways, just as rewarding—if not more so—than the final product itself.
What could be improved
As a designer, identifying areas for improvement is an integral part of the process, and this project was no exception. There were a few aspects I would address differently if given another opportunity.
The Finish
Painting and finishing the speakers turned out to be extremely time-consuming, and I regret taking a few shortcuts, particularly during the sanding phase. While these imperfections might not be noticeable to others, knowing they exist detracts from my satisfaction with the final product. Next time, I would not cut corners at this stage, aiming instead for the flawless, mirrored finish I initially envisioned.
The Power Supply
Selecting the power supply proved somewhat frustrating. Although the chosen model was recommended by the manufacturer for use with my amplifier and should have been adequate, it fell short during peak demands. In the future, I would opt for a power supply that exceeds the maximum required power to ensure stability during power spikes. As noted earlier, while I rarely need maximum volume, it would be comforting to have the capacity to increase the volume without issues, especially for that one epic track.
The Amplifier and Controls
The small enclosure on the back of one speaker houses the amplifier, power switch, and sound control knobs. While functional, the design seems somewhat tacked on, as it doesn’t sit flush with the rest of the speaker. It works perfectly, but aesthetically, it appears as an afterthought. In a future iteration, I would redesign this feature to integrate more seamlessly with the overall design, enhancing the speaker’s aesthetic coherence.


